Monday, October 18, 2010

The Ultimate Chocolate Cake

Last week, I got this lovely book from the library - Great Cakes from Good Housekeeping. It had the loveliest recipes, really well explained. The most enticing one was called The Ultimate Chocolate Cake. And I HAD to try it. I followed the recipe to the letter and trust me, all that effort was well worth it. I'm definitely making this one again!


Ingredients:
  • 175g unsalted butter, softened
  • 375g plain chocolate
  • 175g caster sugar
  • 175g ground almonds
  • 6 large eggs, separated
  • 75g fresh brown breadcrumbs
  • 3tbsp cocoa powder
  • pinch of salt
  • 125g white chocolate, roughly chopped
  • 125g milk chocolate, roughly chopped
  • 142 ml carton double cream
Method:
  • Preheat the oven to 180°C(160°C fan ocen) mark 4. Grease a 20.5 inch square cake tin and baseline with greaseproof paper. (I used a silicone tray. Saves you the trouble of using paper and greasing.)
  • Break 225g plain chocolate into a bowl and melt. Cool for 10 minutes. Click here to know the right way to melt chocolate. 
  • Meanwhile, beat the butter and sugar until light and fluffy. Stir in the cooled melted chocolate with the almonds, egg yolks, breadcrumbs and cocoa powder.
  • Whisk the egg whites and salt until they form soft peaks. Fold into the chocolate mixture with the chopped chocolate.
  • Pour the mixture into the prepared tin and bake for about 1 hour 20 minutes, covering loosely with foil if necessary. Cool in the tin for 15 minutes, then turn out on to a wire rack to finish cooling.
  • While the cake is cooling, place the remaining 150g plain chocolate and the cream in a bowl and melt. (I heated the cream to almost boiling point, switched off the stove and added the chocolate. The chocolate melts by itself and this makes the perfect glazing according to me.) Cool for about 30 minutes or until slightly thickened. Pour over the cake to cover and swirl with a palette knife, then leave to cool. Cut up into squares, store in an airtight container for up to five days.


I don't feel like returning the book. 

Sausage and Egg Pie

Something to make on a very lazy day - requires minimum effort and tastes good too! 

For the pastry 

I needed an easy recipe for making the pastry for the pie. Not a big fan of playing around with butter. Searched online and found this really simple way to make butter-less pastry

Ingredients

  • 225g flour
  • 1/2 tsp baking powder
  • pinch salt
  • 4 tbsp mild salad oil
  • 1/2 beaten egg
  • 3 tbsp hot water
  • If you're making something sweet, add a tablespoon of caster sugar
Method
  • Put all the ingredients into a lidded plastic box and shake it for at least a minute. When you take off the lid, you will find a lumpy mixture; form it into a ball with your hands, and roll it out on a floured surface.
  • Place the rolled out pastry onto a pie dish. I didn't have one and used a loaf tin instead.
For the filling

Ingredients:
  • Onion - 1 sliced
  • Green Pepper(Capsicum) - 1 sliced
  • Chicken Sausages sliced- 2 cups 
  • Eggs - 4
  • Salt
  • Pepper
  • Oil - 2 tbsp
Method:
  • Preheat oven to 180°C.
  • Heat oil and saute the onions, green pepper and sausages till cooked. Season with salt and pepper. Add chilli powder if you want extra heat. 
  • Once done, remove from flame and cool.
  • Beat the eggs, add salt and pepper and mix with the sausages.
  • Pour this into the pie dish lined with pastry.
  • Bake for 30 minutes.
  • Slice and serve!

Wednesday, August 11, 2010

Peri-Peri Chicken with mushrooms and potato wedges


This here is something wonderfully easy to make but tastes like you've spent ages on it. All you need is a readymade peri-peri sauce. I use Nando's medium peri-peri sauce which you get to buy in most supermarkets.

Ingredients:
  1. Chicken thighs and legs - 2
  2. Button mushroom - 100 gm
  3. Potatoes - 2 cut in wedges
  4. Chopped garlic/Garlic paste - 2 tbsp
  5. Paprika powder/Pepper powder - 1 tsp
  6. Peri-Peri sauce 
  7. Dried oregano
  8. Olive oil
  9. Salt
Method:

The chicken:
  1. Preheat oven to 180°C.
  2. Make small slits on the chicken before marinating in the peri-peri sauce, paprika, garlic and salt. Leave for half an hour.
  3. Place in a roasting pan and cover with kitchen foil. Poke the foil with a knife a few times to allow steam to escape.
  4. Place the pan in the oven for 45 minutes.
  5. Once done, drain the liquid in the pan to a saucepan. Simmer till reduced to a thick sauce. IF necessary, add corn flour to thicken.
  6. Pour the sauce on the chicken before serving.
Mushrooms:
  1. Heat 2 tbsps of olive oil in a pan.
  2. Add chopped garlic and saute till fried.
  3. Add the mushrooms and 2 tbsps of peri-peri sauce.
  4. Add salt and pepper.
  5. Cook on medium heat till the mushrooms are done.
  6. Serve.
Potato wedges:
  1. Boil the wedges in salted water till just done so they hold their shape and do not get mashed. 
  2. Drain the wedges.
  3. In a bowl, mix a bit of of olive oil and dried oregano.
  4. Toss the potatoes in the oil and then place in a preheated oven for 15-20 minutes till crisp.
  5. Serve with the chicken and mushrooms.

Happy Eating! :)

Thursday, May 13, 2010

Pudding Time!


Easy tasty pudding made in minutes!

Ingredients:
  1. Tinned sliced pineapple - 6 slices chopped roughly
  2. Milk - 2 cups (500 gm)
  3. Condensed milk - 1 tin
  4. Sugar - 3 tbsps
  5. Agar agar or gelatin - 6 gms
  6. Sliced almonds to garnish
Method:
  1. In a saucepan, cook the chopped pineapples with 2 tablespoons of sugar till all the water evaporates. Layer the bottom of the serving bowl with this.
  2. Mix the milk, condensed milk and 1 tbsp sugar in a pan and heat. Put off the flame just as it comes to the boil.
  3. Dissolve the agar agar or gelatin in a little water and add this to the milk mixture.
  4. Pour this mixture over the pineapple bits and allow to cool. Cover and refrigerate till set.
That's it! And trust me, it's really yummy!

Friday, April 23, 2010

Mom's caramel cake


My mom has always baked this cake ever since I can remember. I even celebrated a birthday in school cutting this cake with my best friend. It has been a family favorite for years and is the simplest of recipes to prepare. I've called it a caramel cake because some of the sugar is caramelized before adding it to the cake mixture. And this is how you do it.

Ingredients:
  1. Flour - 3/4 cup
  2. Sugar - 3/4 cup powdered
  3. Sugar - 1/2 cup for caramelizing
  4. Unsalted butter - 50 grams
  5. Eggs - 3
  6. Baking powder - 1/2 tsp
  7. Vanilla essence - 1 tsp
  8. Powdered cardamom, cinnamon and nutmeg - a pinch of each 
Method:
  1. Preheat the oven to 180 degrees Celsius.
  2. Caramelize the sugar. To do this, heat the sugar in a bowl over medium heat till it melts and turns a dark reddish brown. When that happens, remove from heat and add a dash of water and mix well. This stops the caramelized sugar from solidifying. Be careful when you add the water. There will be a lot of spluttering. 
  3. Beat the eggs, butter and powdered sugar on medium speed till creamy.
  4. Mix the flour, baking powder and spices and fold it into the egg mixture. 
  5. Add the caramelized sugar and vanilla essence and mix well.
  6. Pour into a greased baking tin and bake for 20-25 minutes.
  7. Take out, cool and serve. 
This works brilliantly well as an accompaniment to your evening tea and also with some ice cream!

Wednesday, April 14, 2010

Homemade buns

For the Easter holidays, we went on a trip to London, which meant quite a long drive. So on the day we were supposed to leave, I packed a few burger sandwiches for the road. But, we ended up postponing the trip by one day and had those burgers for dinner that night instead. The next day, I was out of bread so opted to make buns instead of walking all the way to the store. :) I know each one is of a different size but it was fun to make and tasted quite decent too.

Ingredients:
  • 1 cup milk
  • 1/2 cup water
  • 1/4 cup butter
  • 4 1/2 cups all-purpose flour
  • 1 (.25 ounce) package instant yeast
  • 2 tablespoons white sugar
  • 1 1/2 teaspoons salt
  • 1 egg
Method:
  • In a small saucepan, heat milk, water and butter until very warm.
  • In a large bowl, mix together 1 3/4 cup flour, yeast, sugar and salt. Mix milk mixture into flour mixture, and then mix in egg. Stir in the remaining flour, 1/2 cup at a time, beating well after each addition. When the dough has pulled together, turn it out onto a lightly floured surface, and knead until smooth and elastic, about 8 minutes.
  • Divide dough into 12 equal pieces. Shape into smooth balls, and place on a greased baking sheet. Flatten slightly. Cover, and let rise for 30 to 35 minutes.
  • Bake at 200 degrees C for 10 to 12 minutes, or until golden brown.

Wednesday, March 31, 2010

Fatayer


It began with a sudden craving for Za'atar. And when I checked out the recipe online, the main ingredient for that turned out to be something called sumac. I don't even know what that is! Then I remembered Fatayers which is another favorite Arabic food of mine. Turns out it isn't that hard to make. Fatayers are usually made with a filling of cheese or spinach or meat. I made mine with tuna. Tuna is like my experimental food, because it is okay if it goes wrong; it's only tuna! :) Next time, I'll try this with some other filling.

I've written here only how to make the base, and not the filling. Any form of masala to your taste will do. Or check online for the authentic filling. :)

Ingredients:
  1. 1 cup all purpose flour
  2. 1 tsp yeast
  3. 1/2 tsp salt
  4. 3 tbsp vegetable oil
  5. 1/2 cup water
Method:

Step 1:
  • Pour the warm water into a mixing bowl and add yeast, and let stand for a few minutes to proof.
  • Add the salt and oil, and stir well to combine.
  • Gradually add the flour, stirring till a soft smooth dough is achieved.
  • Knead the dough until it is smooth and satiny.
  • Roll the dough into small balls. Cover them with a towel and allow to rise for about 1 and a half hours.
Step 2:
  • Take a piece of the dough in hand and press it into a 3 or 4 inch round, about ¼ inch thick.
  • Place a spoonful of the filling mixture in the center of the dough round.
  • Draw up and seal four edges of the dough to create a square - leaving a small opening in the center.
  • Arrange the pies on a baking tray and bake in a preheated 180°C oven for about 15 minutes.
  • Serve!

Friday, March 19, 2010

Mutton Fry


I am not very fond of mutton but I loved this dish. The taste I believe is in the masala. I usually use the readymade ones instead of trying to come up with something myself. And for this recipe, I used Ann's meat masala powder. 

Ingredients:
  1. Mutton, diced into very small pieces - 1 kg
  2. Onions, finely sliced - 2 big 
  3. Meat Masala powder - 50 g
  4. Ginger-garlic paste - 2 tbsp
  5. Vinegar - 1 tbsp
  6. Coconut milk - 1 cup
  7. Curry Leaves
  8. Oil - 1/4 cup
  9. Salt
Method:
  1. Marinate the mutton pieces with the meat masala, salt and vinegar for a few hours.
  2. Heat the oil. Add the mutton, ginger-garlic paste and curry leaves and fry till well done.
  3. Remove the fried mutton from the oil and keep aside.
  4. To the same oil, add the sliced onions and saute till they turn translucent. Once done, add the mutton and mix well.
  5. Add the coconut milk and fry till dry.
  6. Garnish with fried shallots and curry leaves. 
That was really simple to make and very tasty too!


Thursday, March 18, 2010

Pasta and mashed potatoes


This funny looking thing was our dinner last night. :) That's pasta and mashed potatoes. I made the pasta with red cabbage and carrots, and being the hard core non-vegetarian that I am, added a bit of tuna too just for the taste. I then topped it with mashed potatoes and baked the dish before serving. I don't have those piping bags so made one with tin foil for piping the potato. Use and throw - excellent! :)

This dish was one of those experiments that actually worked. I used red cabbage and carrots. Peas would have been really good too in this, but I don't like them so didn't use them. This is how I made it.

Ingredients:
  1. Red cabbage, shredded - 2 cups
  2. Carrot, grated - 1 cup
  3. Onion, finely sliced - 1
  4. Green chillies, sliced - 2
  5. Tuna - 1 tin
  6. Ginger Garlic paste - 1 tbsp
  7. Potatoes - 2 large
  8. Tomatoes - 2 large
  9. Chilli powder - 1 tsp
  10. Turmeric powder - 1/2 tsp
  11. Soya Sauce - 1 tbsp
  12. Tomato puree - 2 tbsp
  13. Chicken/Vegetable stock cubes - 1
  14. Oregano (dried)
  15. Salt
  16. Pepper
  17. Olive oil
  18. Vegetable/Sunflower oil
Method:

1. To make the potatoes
  • Cook the potatoes in salted water till soft.
  • Mash the potatoes and add a dash of olive oil, salt, pepper and a sprinkle of oregano.
  • Whisk the potatoes till they are of a nice creamy texture.
2. To make the pasta
  • Heat some oil. To it, add the tuna, ginger garlic paste, chilli powder, turmeric powder and salt and saute till dry.
  • Add the carrots and cabbage and mix well. Saute till all the moisture disappears and the cabbage starts frying. Keep aside
  • Cook the pasta in salted boiling water for about 10 minutes till done. Drain the pasta and pour cold water through it so the pasta does not stick together.
  • In another pan, heat some oil and saute the onions and green chilli. Add the stock cube, soya sauce, tomatoes, tomato puree and cook till the oil separates. To this, add the cabbage cooked earlier and mix well. Then add the pasta and mix thoroughly. Add some water to keep it moist.
  • Pour this mixture into a casserole dish or baking bowl.

3. The final step
  • Preheat oven to 180°C.
  • Spread the mashed potatoes on the pasta and bake for 30 minutes.

Tuesday, March 9, 2010

Lazy day - rice and sambar!


It was two in the afternoon and I hadn't done a thing yet. Started reading a book in the morning and fell asleep! The book was nice, it was just too early to read. And by then it was also too late to cook anything that takes effort. (I like to finish everything before the man gets home.) Hence the all time faithful rice and sambar.

My love for sambar dates back to prehistoric times, well, to as early as I can remember. I remember, as a kid, I used to beg Mom to add lesser vegetables in the curry. You see, the Keralite sambar is made up of not just one or two vegetables but, I think, of everything you find at home. My mom's sambar would have lady's fingers, drumsticks, yam, carrots, cucumber(vellari) and others I've forgotten. As a child, my sister and I would never help ourselves to the vegetables except for a few chosen ones of our liking. I remember, Mom would in the end have to finish all the pieces herself. Well, being a vegetarian, she did enjoy it I think.

Sambar looks complicated but there are short cuts to make this one too, which is what I follow. This definitely is not the authentic way to do it but it does taste well above decent and is easy to fix. In the recipe below, I have used vegetables I had at the time.

SAMBAR:

Ingredients:
1. Toor dal - 100 gms
2. Onion - 1 finely sliced
3. Garlic - 3 cloves chopped
4. Tomato - 1 chopped
5. Potato - 1 cut into big pieces
6. Carrot - 1 diced
7. Lady's fingers - 6 medium
8. Tamarind paste - 1 tsp
9. Sambar powder - 2 tbsp
10. Turmeric powder - 1/2 tsp
11. Mustard seeds
12. Water
13. Oil
14. Salt
15. Curry leaves
16. Green chillies - 2 slit

Method:
1. In a pressure cooker, put all the ingredients from 1 to 6 and the green chillies. Add some water, salt and turmeric powder and cook for 3 whistles.
2. In a pan, heat some oil, splutter mustard seeds and curry leaves and fry the lady's fingers till the stickiness disappears.
3. Add the tamarind paste and sambar powder along with some water and let it boil.
4. To this, add the cooked mix from the pressure cooker, adjust the consistency and boil for 2 minutes.

I didn't have a good enough picture of any sambar I had made. The one attached is cropped from an old pic I had. :)

Sunday, March 7, 2010

Carrot Halwa and a crappy slapstick flick!

It had been ages since we did any sort of socializing and so last night we decided to make up for it. Since the man had to work, we couldn't go out anywhere. Had a few friends over for dinner. Jan cooked and brought along some yummy chicken curry. And I made ghee rice, chapatis and dessert.

I'll write about my easy version of ghee rice another day.(I don't use ghee!) :) Let's do the desserts today. I baked a cake and made carrot halwa. By baked a cake, I don't mean I measured flour, butter and the rest; instead, I used my ever loyal Betty Crocker cake mix. They're amazing, extremely delicious and comes in loads of flavors. And you never fail with Betty Crocker. Their brownies, cookies and cake mixes are to die for. I do bake from scratch once in a while to feel the pride but BC mixes are easy peasy.

Carrot Halwa is something I hadn't ever made till very recently. First, I checked online for a good recipe. That reminds me. www.pachakam.com has helped me a lot. They have tons of recipes and many of them are really good. I found a variety of methods for Gajar Halwa there. I combined a few and made my own version. A lucky gamble that paid off. The dish did turn out pretty well and the best part is it is really simple to do.

CARROT HALWA

Ingredients:
1. Carrots - 5 medium
2. Condensed milk - 150 grams
3. Milk - 1 cup
4. Sugar - 2 tbsp
5. Cardamom powder - 1/4 tsp
6. Oil - 2 tbsp

Method:
Before I begin, I have to let you know I use only non-stick pots/pans to cook in. Learnt it from my mom. Makes cooking easy and cleaning even easier. :)
1. Grate the carrots. Heat the oil in a pan, add the grated carrots and stir for 2 minutes.
2. Add the rest of the ingredients - condensed milk, milk, sugar and cardamom powder. I also added a dash of rose water just for the fragrance. It's lovely!
3. That's all. Keep stirring it every few minutes till done.
4. Garnish with sliced almonds.


That honestly was one of the simplest complicated-looking dishes I've ever prepared. The only hard job is grating the carrots. But if you have a food processor, even that is taken care of.

So last night, after quite a heavy dinner, we sat down to watch a movie. I don't know why fate made us choose De Dana Dan. Maybe it was to punish us for having good food while there are hungry children starving in other countries. Well, that pretty much sums up how the movie was. Priyadarshan, we all know, has his own genre of movies, the genre being 'confusion'. But this was way beyond anything I've ever seen till now. If you want to get back at somebody you hate, just make them sit through this pile of crap. Avoid it. That is all that can be said about the movie.

That said and done, it was a fun night. Looking forward to more of those.

Friday, March 5, 2010

Of puttu and coconut and all things yummy!


The term 'F World' was coined by my husband who named one of his photo albums on facebook the same. He had uploaded photos of food I'd cooked in that album. And let me tell you. That was one of my proudest moments. Ever! I loved the fact that he wanted to do that and I also loved the comments those pictures generated.

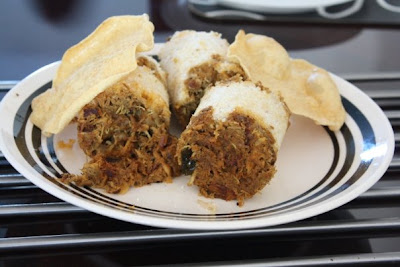
One of the pictures that brought in a lot of response was the 'Erachi puttu' one. Now for those of you non-Malayali souls, erachi=meat and puttu= well, a form of steamed rice cakes. Lots of people loved the pictures. They wanted to know the recipe too. But guess what; my erachi puttu came about because of leftover chicken masala and due to lack of coconut in the house.

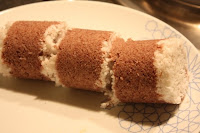
Every Malayali girl, on getting married, gets entrusted with a puttu maker in the hope she'll carry on her Malayali legacy. I did too. :) Puttu is a wonderful Keralite dish made by steaming powdered rice, each cake separated by grated coconut. But you see, I never bought coconut till very recently. (My ancestors must be turning in their graves now!) Only because I did not know how to crack open one. So, the other day, when I was out of ideas on what to cook, I remembered my puttu maker growing senile in its corner of the cupboard. And I thought why not! I put forward the idea to my husband and he was all for it too. Watch me making it that is.

Here, I have to mention that my mom has been my lifeline. Every time I have a doubt or need to know something, I call her. Most of the food I cook are her recipes, or my take on them. More on my mom in a different post. But a word of advice to girls new to the kitchen: Please have your mum on speed dial and on Skype. You'll need it.

So I called my mom up (as always). She gave me the instructions on puttu making which I now write below.

PUTTU

Things you need:
1. Puttu powder - any brand or the one your mom sent you.

2. Puttu maker - See picture on the right

3. Water
4. Grated coconut
5. Salt

Process:
1. Mix the powder with salted water till you get a very coarse powder. Almost in a ratio of a cup of powder to 3/4 cup of water. It may be quite runny in the beginning when you add the water but as you keep mixing it will turn drier.
2. Now sprinkle a bit of the coconut in the puttu maker. Add around 2 handfuls of the rice powder. Repeat this to form layers of rice separated by thin layers of coconut.
3. Boil water in the bowl and place the maker on top of it. Once the steam starts coming out of the top, wait for another 3 minutes before taking the maker off the stove.

4. Push out the puttu onto a plate and Voila!


But you see, that day I did not have any coconut at home. But I did have some leftover Chicken masala from the previous day in the fridge. So I just substituted the coconut with the chicken. :)

There is no Nazi rule to make any dish. Cooking is all about improvising. (Wow, I need to copyright that quote.) So that's the story of my erachi puttu. Gitu, I guess this answers your question.

By the way, I think puttu has to be had with kadala curry(black chana curry). I don't think it does justice to the puttu when people have it with bananas and sugar. No way. And the easiest and yummiest way to make kadala curry is as below:

KADALA CURRRY

Ingredients:
1. Black chana - 1 cup (soaked overnight)
2. Onion - 1 (finely sliced)
3. Tomato - 1 (chopped)
4. Green chilli - 2 (slit)
5. Ginger garlic paste - 1 tsp
6. Coconut Milk - 1 cup
7. Coriander powder - 3 heaped tsp
8. Chilli powder - 1 tsp or lesser if u fancy your curry less hotter
9. Turmeric powder - 1/2 tsp
10. Garam Masala - 1/2 tsp
11. Mustard seeds
12. Shallots - a few (finely sliced)
13. Curry leaves
14. Salt - As required

Method:
Before I write something here, I need to thank Denis Papin, the inventor of the pressure cooker. May God rest his soul in peace. I just love the thing. It really makes life so much easier. Right, the curry now:
1. In a pressure cooker, dump ingredients 1 to 5.
2. In a small pan, dry roast the powders 7 to 9 till the raw smell is gone. Add that to the pressure cooker. Add the garam masala too.
3. Add a little water and cook it for about 3 - 4 whistles.
4. In a small pan, add a little oil, splutter the mustard seeds. Add the shallots and curry leaves and fry till the shallots turn brown.
5. Open the cooker and add the mixture from step 4 and the coconut milk*. Boil it on gentle heat and remove from the stove. Curry done!
* Coconut milk is easy. You get to buy it everywhere My personal preference is Maggi coconut milk powder.

I just realized I'm terrible at writing recipes. Hopefully, will improve with time.

If any of you try this at home, do let me know. And don't worry if you don't have a puttu maker. Use your idli maker. The puttu will be shaped different that's all.

P.S. Turns out it is actually easy to break a coconut. Keep hitting it with a decently heavy possession of yours. (I use my big knife.) Start with the side where the wide eye is. (If you look carefully, you'll see a coconut has three eye-like marks on the top, one wider than the other two.) Keep hitting around the coconut and it'll break open when it feels like it. You don't even have to apply much force.

The picture below is when we tried the same thing at Chithra's place with her leftover chicken masala. Must say that was YUMMY!

Thursday, March 4, 2010

Marriage & Food - Conjoined twins.


Have you had one of those days when you super fervently prayed and prayed your wishes could come true and life could have a complete make-over? I bet you did. In fact, I know you did. I've had loads of them myself. Every day there was a new dream, a new wish. Some lasted for a day, like hoping 'somebody' would suddenly fall dead. And some lasted forever, like better grades, good looks and falling in love. Some of them came true. Many did not(that somebody didn't even fall sick, forget dying!)

Ah well, among some of the dreams that did come true was my husband. Meeting him, falling in love and getting married. That was wow! That said and done, let me tell you about actual marriage and what it entails. :)

No no, don't worry. It is not as bad as I made it sound. With the perfect partner, marriage is a lot of fun. And I know I've been married for just a few months now but that has been more than enough to teach me this very valuable fact - For a man, the highest priority in life is FOOD. You heard it right. It's food and not family or even video games! And here, I intend to concentrate on just that - food, a very very integral part of a successful marriage.

When I came here to Leeds to join my husband after the wedding, I was quite confident. I did know a bit of cooking. I honestly thought I was decent at it and I was sure I wouldn't have any trouble in that department. Boy, was I wrong! Turns out I had married an incarnation of Gordon Ramsay! Some of the world's top food critics I'm sure will be humbled in his presence. Jokes aside, even though I crib incessantly about the "constructive criticism" as he calls it, I'm secretly glad for it because it really helps me improve. (And I hope he never reads this!)

I love being married. Trust me. I love everything about it. Well, almost. There's one tiny thing I loathe. And that's deciding what to cook each day. Most days rather. And the last month, since the man's been working from home due to an unfortunate illness, I have had to make that decision twice a day. Sigh. But looking at the silver lining, this inspires me to be 'innovative' in the kitchen. I can hear mine and my husband's tummies shriek and scream in protest as I type this. Evil grin.

In the last few months, I have experimented loads. Many of them were spectacular failures! But surprisingly, some of them were satisfyingly good too. And those little successes goad me on each day. And tell you what. Cooking is fun! (Except for the cleaning up part of it.) But the end result is highly satisfying. That is my motivation. A well made dish that incites a sigh of contentment or a very minimal level of criticism from the man.

What I intend to do with this blog is 1. Show off and 2. Try and impart my worldly wisdom to other young girls who are as clueless as I was or worse. ;)

Do keep reading to know the stories behind the stuff in the picture above. Take care all! Eat well!

And oh yeah, before I forget, I need to give credit where it is due. All the pictures in this blog were taken by my husband and I'm deeply grateful to him for he, for at least that moment, did deem my food picture-worthy.